Automate Your Tasks with Bash Scripts: A Practical Guide for Beginners

Aditya is passionate about DevOps and Java development, especially within the development of web applications and the integration of DevOps tools. he likes to contribute to the Open Source and engaging in the Cloud-native ecosystem.
Hey there, when it comes to developing CLI applications or working with DevOps, you will find shell scripting everywhere. While some people claim that Python and Go have replaced shell scripting. However, I have seen many open-source projects still using shell scripting, and companies often expect candidates to be proficient in it.
So now that we know that shell scripting is important and useful, let's explore the areas where you can apply shell scripting. After that, we will dive into learning shell scripting itself. We will be following a hands-on approach, which means you will be typing all the commands and writing scripts.
where we can use shell script?
Automating the code compiling process.
Running a program or creating a program environment.
Completing batch Manipulating files.
Linking existing programs together.
Executing routine backups.
Monitoring a system.
Instead of directly jumping into scripting, we will first take a look at what Vim is and how we can use it in our hands-on approach. Although you can use a normal text editor, that would be too easy, and you would miss out on the whole essence of shell scripting. Therefore, in this blog session, I will use Vim as the text editor, and we will also be executing some Linux commands to run our script. If you don't know any Linux commands, you can refer to the cheatsheet and learn them while we are learning scripting. Alternatively, you can first learn Linux commands. There are lots of blogs about it on Hashnode. Let's get started!
Basics of Vim 🚩
To write something in Vim, you first have to press the i button to enter insert mode. This mode allows you to insert text into your file. Press the Esc button to exit insert mode. Additionally, you can use a to append text.
You can save and exit the file by typing :wq (w for write and q for quit). If you want to discard the changes, you can use :q! to ignore all the modifications made to the current file. To use save and exit commands you need to get out of insert or append mode.
Let's Write and Execute Scripts 🚩
Now that you know how to create and edit files in Vim, let's dive into writing some Bash scripts. To begin, open your terminal and create a new file named shelltest.sh using the touch command:
touch shelltest.sh
Make sure you are in the desired directory (use the pwd command to verify). Next, open the newly created shelltest.sh file with Vim:
Type:
echo Hello world!Press:
EscType:
:wq
To execute the script, simply type the shell you are using followed by the file name. For example, if you're using Bash, enter:
bash shelltest.sh
If you don't want to specify the shell every time, you can add your shell's path at the top of the file. To find the path of your shell, use the command:
echo $SHELL
For instance, if the output is /usr/bin/zsh, you are using Zsh. Copy the path using Ctrl + Shift + C.
Now, open shelltest.sh again with Vim, press i to enter insert mode and type #! followed by pasting the path using Ctrl + Shift + V. This sets the shell path at the top of the script:
#!/usr/bin/zsh
echo "Hello world!"
Save and exit the file. Now your Bash script is ready to run.
The first line
#!/usr/bin/zshis called a shebang and specifies the path to the Zsh interpreter that should be used to run the script.
Let's try to execute the file by typing:
./shelltest.sh
If you encounter the error message: zsh: permission denied: ./shelltest.sh, it means you don't have permission to execute the file. You can resolve this by granting execute permission to the file using the following command:
chmod u+x shelltest.sh
The chmod u+x command grants the user execute permission. Now, try executing ./shelltest.sh again. You should see the output: Hello World!
Variables 🚩
In Bash scripting, variables are used to store and manipulate data. They allow you to keep track of information that can change or be reused throughout the execution of your script. Bash variables are case-sensitive, and by convention, they are written in uppercase in bash. here is an example you can use a variable in Bash:
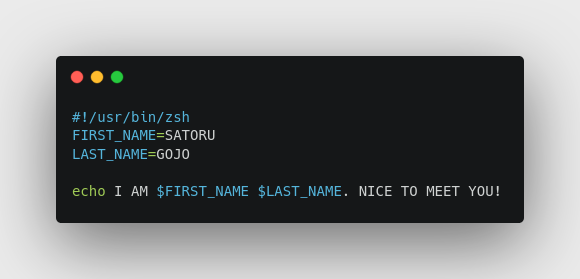
To access the value stored in a variable, you need to prepend a dollar sign ($) before the variable name. This tells Bash to fetch the value associated with that variable. Try to run the above script on your machine.
Read User Input 🚩
Create a new file and open it with Vim. Inside Vim, type the following code:

In this script, we ask the user to enter their first and last names and then use the read command to store the input into FIRST_NAME and LAST_NAME variables. Run the above code snippet in your terminal.
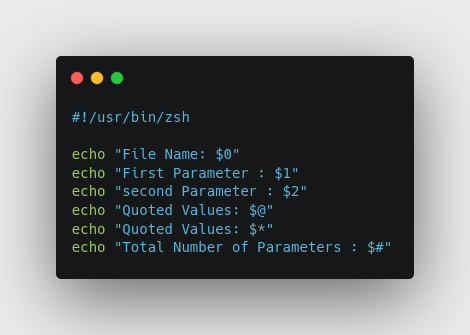
Positional Arguments 🚩
Bash commands can take arguments at specific positions, counted from one (0 is reserved for the shell). Let's look at a simple example:
Enter the following code in your script:
#!/usr/bin/zsh
echo "Good Morning $2 $1"
If you execute this script with the values ./file_name name surname, it will output: Good Morning surname name. Here, we tell the script to take the second argument first ($2) and then the first argument ($1). You can refer to the following script to know more about positional arguments:
Run in the terminal after writing the above script:
./file_name Ronaldo Messi "Both are" "Goats"
Input & Output Redirection 🚩
Output Redirection :
Output redirection allows us to direct the output of a command to a file or append it to the end of the file. The > symbol is used to redirect output, while >> is used to append output to the end of the file.
Let's understand this with an example:
echo "Hello World" > Hello.txt
echo "Have a Good day" >> Hello.txt
In the above example, the first command will write Hello World to Hello.txt, and the second command will append Have a Good day to the end of Hello.txt.
Input Redirection :
Input redirection allows us to take input from a file or an input stream. The < symbol is used for input redirection.
cat < Hello.txt
In this command, the contents of Hello.txt are used as input to the cat command and the contents are printed to the terminal.
Additionally, << is used for a here document, and <<< is used for a single word here document.
cat << EOF
Hey
I am aditya
Nice to meet You
EOF
The above command takes input from the lines until the word EOF is repeated.
wc -c <<< "Hello"
In this command, the string "Hello" is used as input for the wc command with the -c flag to count the number of characters. (it takes only strings)
Comparisons 🚩
In Bash, you can use the test command to compare strings, but most people prefer using square brackets for string comparisons. Enter the following command one by one :
[ "hello" = "hello" ]

echo $?
In the above command, the strings "hello" and "hello" are compared. If the comparison is successful, the exit status will be 0, indicating success. If the comparison fails, the exit status will be 1, indicating failure.
You can use the exit status codes to check the success or failure of commands in scripts. The following table shows some common exit status codes:
| Exit Status Code | Description |
| 0 | Success |
| 1 | General Errors |
| 2 | Misuse of shell builtins |
| 126 | Command invoked cannot execute |
| 127 | Command not found |
| 128 | Invalid argument to exit |
| 128+n | Fatal error signal "n" |
| 130 | Script terminated by Control-C |
| 255 | Exit status out of range |
If-Else Statements 🚩
If you have done programming before, 'if' and 'else' statements should be very familiar to you. The idea is the same in bash, but if you haven't encountered them before, don't worry; they're easy to understand. I'll explain every word, so let's dive into it. Look at the following code and type it in your file.

Let's look at the above code line by line. First, we have the shebang, which we've already covered. Moving to the next line, we encounter the if [ "${1,,}" = $USER" ]; then statement. This line begins an if statement, which checks if the first argument (the provided username), converted to lowercase, matches the value of the $USER environment variable. If the condition is true, it echoes the provided username. If the condition is not true, it proceeds to the next line and checks for the next similar condition: [ "${1,,}" = "help" ]; then. This condition also checks if the provided username, when converted to lowercase, matches the string "help". If this condition is true, it echoes the specified string; otherwise, it moves forward. Next, we encounter the else statement, which is usually the last statement when neither of the previous conditions is true. In this case, it echoes a different string. Finally, fi specifies the end of the if-else statements.
${1,}converts the first argument to lowercase, and${1,,}converts it to all lowercase.
Case Statement 🚩
In Bash, a case statement is used for conditional branching, much like the switch-case statements in other programming languages. It allows you to test a variable against multiple patterns and execute specific code blocks based on the matching pattern. Let's look at the following code snippet:

Here we are using the case command to define its cases. We then pass arguments to be tested against those cases. The $USER variable holds the value of our username. If the arguments match the username, we will execute the corresponding code block, in this case, echoing the username. If the arguments don't match, we will move on to the next case, and so on. If none of the cases match, we will use an asterisk (*) to define a default case where we will echo a specific string. Finally, by specifying esac we indicate that the case should stop checking further. Although the syntax may appear complex, the underlying logic is similar to using if-else statements.
Arrays 🚩
In Bash, an array is a versatile variable that allows you to store multiple values under a single name. These arrays are zero-indexed, meaning that the first element is accessed using index 0, the second with index 1, and so on. Let's explore some code examples to grasp this concept better.
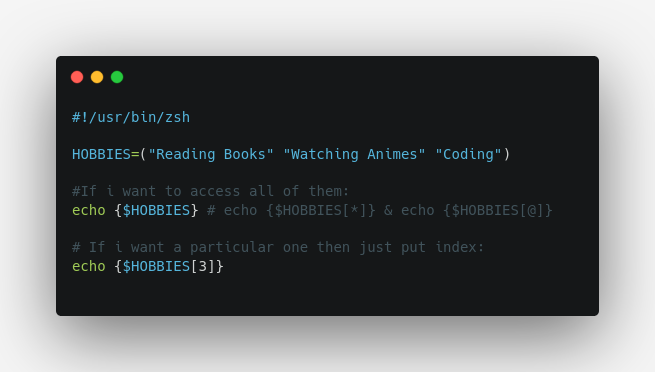
In the example script above, we have a variable named HOBBIES that holds multiple values. This is where the array comes into play. To access the values within the array, simply wrap the variable name {$HOBBIES} with curly braces. Additionally, if you want to retrieve a specific element, you can do so by passing the index number {$HOBBIES[3]} .
If you are using
Zshinstead ofBash, there is a crucial difference to be aware of. InZsh, arrays are 1-indexed, meaning that the first element of the array is accessed using$HOBBIES[1]. As a result,$HOBBIES[0]would actually refer to an empty element before the first element of the array, leading to unexpected behavior when you try to echo it.
So, remember to adjust your array index accordingly when working with arrays in Zsh to avoid any confusion or unexpected results.
Functions 🚩
In BASH, functions are blocks of code that perform specific tasks or operations. They are reusable and help organize your code into logical units, making it easier to read and maintain. I just want to say that it's nothing new; we are simply going to do the same thing but within isolated blocks. This approach prevents our code from conflicts and makes it reusable. Let's take an example to understand it better:

In the above code sample, we can see a function named ShowUpTime that have some logic. The function name ShowUpTime is simply a name, and the parentheses and curly brackets represent the function's syntax. Inside the curly brackets, we have the actual code. The keyword local is used to define a local variable, which is only accessible within that specific block. Additionally, the variable up stores the machine's uptime (which can be obtained by running the uptime command in the terminal), and the cut corresponds to another Linux command that you can explore on your own. The variable names are used to print the machine's uptime. Finally, we call the function, which is required for its execution, after the closing curly bracket.
For functions, I have another example with if and else included. Let's see what that gives us:

We have here a Verify function. Previously, we were just printing the values with strings, but now it is different. The function is taking input, and we are actually returning some error code. The logic remains the same, but there is a return type we are returning an error code, which we have discussed in our comparison section. In our case, if the condition is true, we return 0 otherwise, we return 1. After that, we are adding one more if-else to check the previous output. If it was a success (0), then print something valid if the return code is 1, then print the error or something that you can understand.
When it comes to scripting, there are many commands that make the process easier and faster. Commands like grep can be used to perform operations inside each file. I think you should research more about it. Additionally, there is a command called 'man that you can use to get information about any command. By using 'man,' you can understand what each command offers and learn how to use it effectively.
awk Command 🚩
For me, awk is the most important and powerful command for text processing. It allows you to manipulate data in a structured way and works with text files, operating line by line. This capability enables you to perform various operations on each line of the input. Instead of looking at big definitions, let's look at the examples.
Below we have a normal text file that contains the names:
Eren 25
Levi 30
Armin 22
Now, if we want to print the names of people who are older than 24, we can use the following awk command:
awk '$2 > 24 { print $1 }' data.txt
In this command $2 refers to the second field(Number in front of names) and $1 refers to the first field (Names). The pattern is $2 > 24, which means lines where the second field (age) is greater than 24. it will print that first field which is names.
sed Command 🚩
The sed command in Bash is a stream editor used for text manipulation. It operates on a line-by-line basis, making changes to the input text based on specified patterns. It can perform various actions like search, replace, insert, and delete on the text. Instead of looking at big definitions, let's look at the examples.
Let's create a file called "example.txt" with the following content:
Hello, my name is Aditya.
Hello, Good Morning.
To replace Hello with Hi and modify the file in place, you can use:
sed -i 's/Hello/Hi/' example.txt
After running this command, the content of "example.txt" will be:
Hi, my name is Aditya.
Hi, Good Morning.
In the above command, /Hello/ is the pattern we are searching for, and Hi is the replacement. The -i flag modifies the file in place. There are many other useful flags available, but covering all of them would make this blog too lengthy. I suggest exploring them on your own. You can use the man command to get more information, and there are various ways to learn about commands. I highly recommend expanding your knowledge in this area.
I am also in the learning stage. Just a suggestion don't try to memorize all the commands instead, keep a cheat sheet handy and practice using the commands daily until they become muscle memory. That's it. The blog may have been long, but I wanted to include everything I've learned. If you enjoyed it, consider subscribing to my newsletter for more blogs like this one.
Have a great day and good luck in the future!


